# Core (Python Backend)
Source: https://docs.pipelineui.com/concepts/architecture-of-pipeline-ui/core
The backend engine of Pipeline‑UI
The core of Pipeline‑UI manages the following:
* **Node & Workflow Registration:** Functions decorated with `@node` and `@workflow` are stored and later transformed.
* **Execution Management:** Nodes are executed in order and their progress is streamed via Server‑Sent Events.
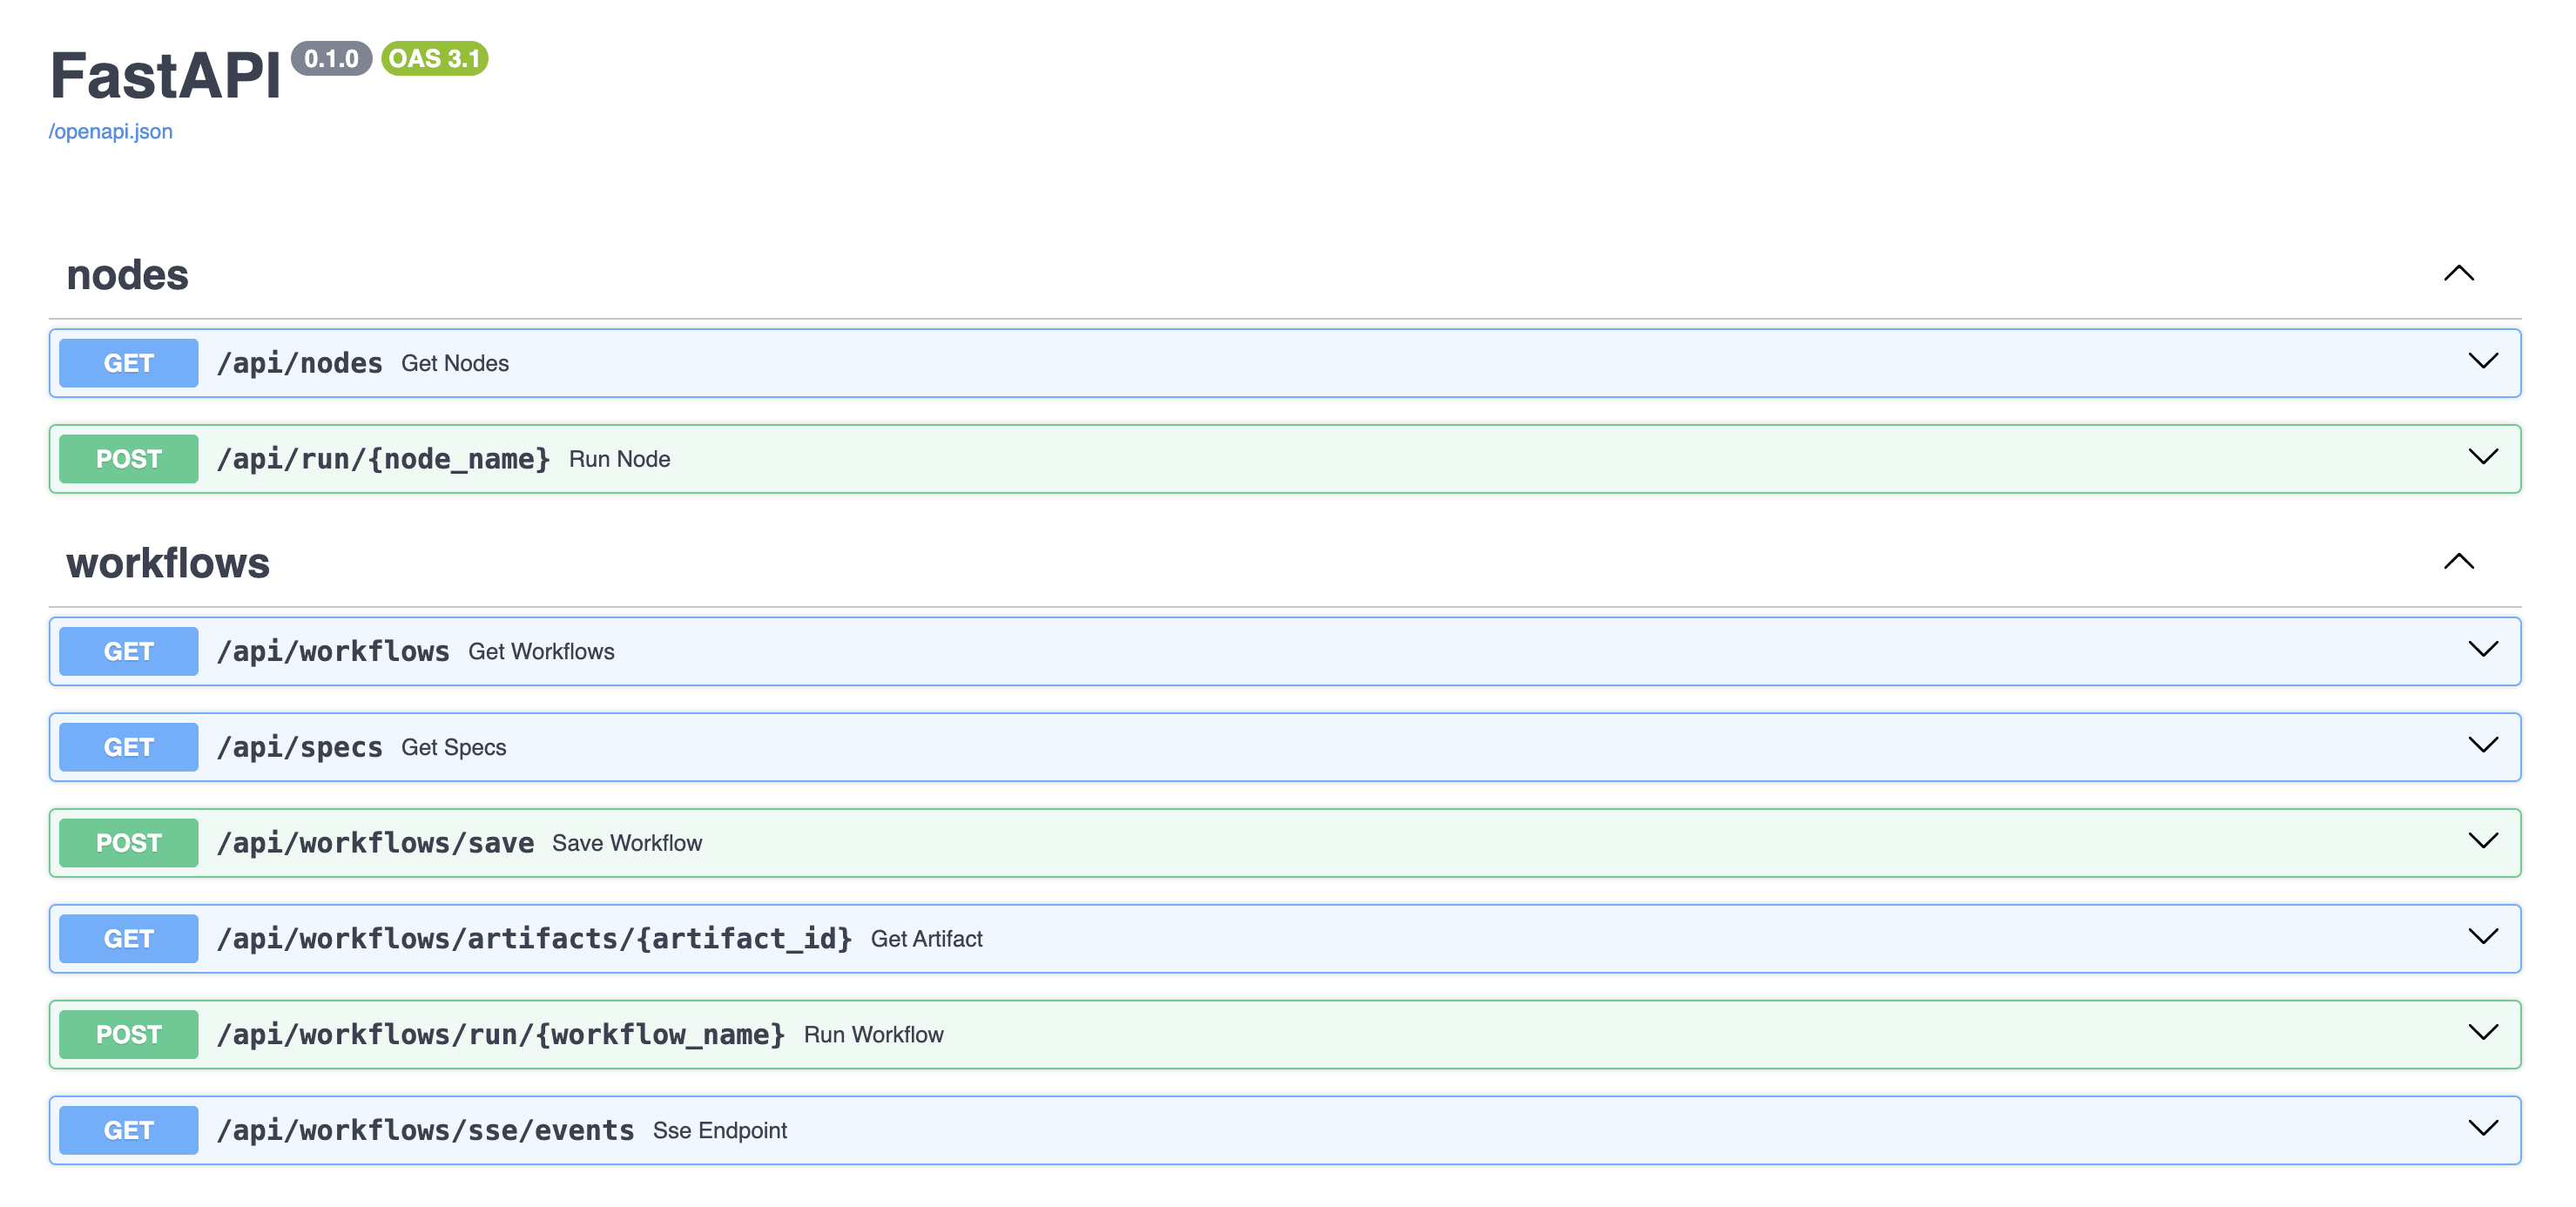
* **FastAPI Server:** A robust FastAPI application exposes endpoints for:
* Executing workflows (/api/workflows/run)
* Serving documentation and the bundled ui
* **I/O & Streaming:** Custom I/O managers capture file operations, and streaming wrappers allow real‑time progress updates.
This backend is written entirely in Python and is designed to be easily extended.
You can view the openapi docs of the backend at [http://127.0.0.1:8114/docs](http://127.0.0.1:8114/docs). This is used by the UI to run the workflows.
# Architecture Overview
Source: https://docs.pipelineui.com/concepts/architecture-of-pipeline-ui/overview
A high‑level overview of Pipeline‑UI
Pipeline‑UI is built on a two‑tier architecture:
* **Core (Python Backend):** Responsible for nodes/workflow registration, execution, and API endpoints.
* **UI (React Frontend):** Provides an interactive interface to design and monitor workflows.
The core consists of a FastAPI backend server with Typer CLI integration, while the UI is built using React.
The two communicate via REST APIs and Server‑Sent Events (SSE). For detailed information on each, see:
* [Core Architecture](./core.mdx)
* [UI Architecture](./ui.mdx)
# UI (React Frontend)
Source: https://docs.pipelineui.com/concepts/architecture-of-pipeline-ui/ui
The visual interface of Pipeline‑UI
# UI Architecture
The UI of Pipeline‑UI is built using:
* **React & TypeScript:** For a modern, robust client‑side experience.
* **Vite:** For fast development and efficient bundling.
* **Custom Components:** Specially built UI components (node blocks, dialogs, notifications, etc.) allow users to design and execute workflows.
* **Playground:** A dedicated area to run and test workflows in real‑time.
The UI communicates with the core backend via REST and SSE, keeping your workflow execution state up-to‑date.
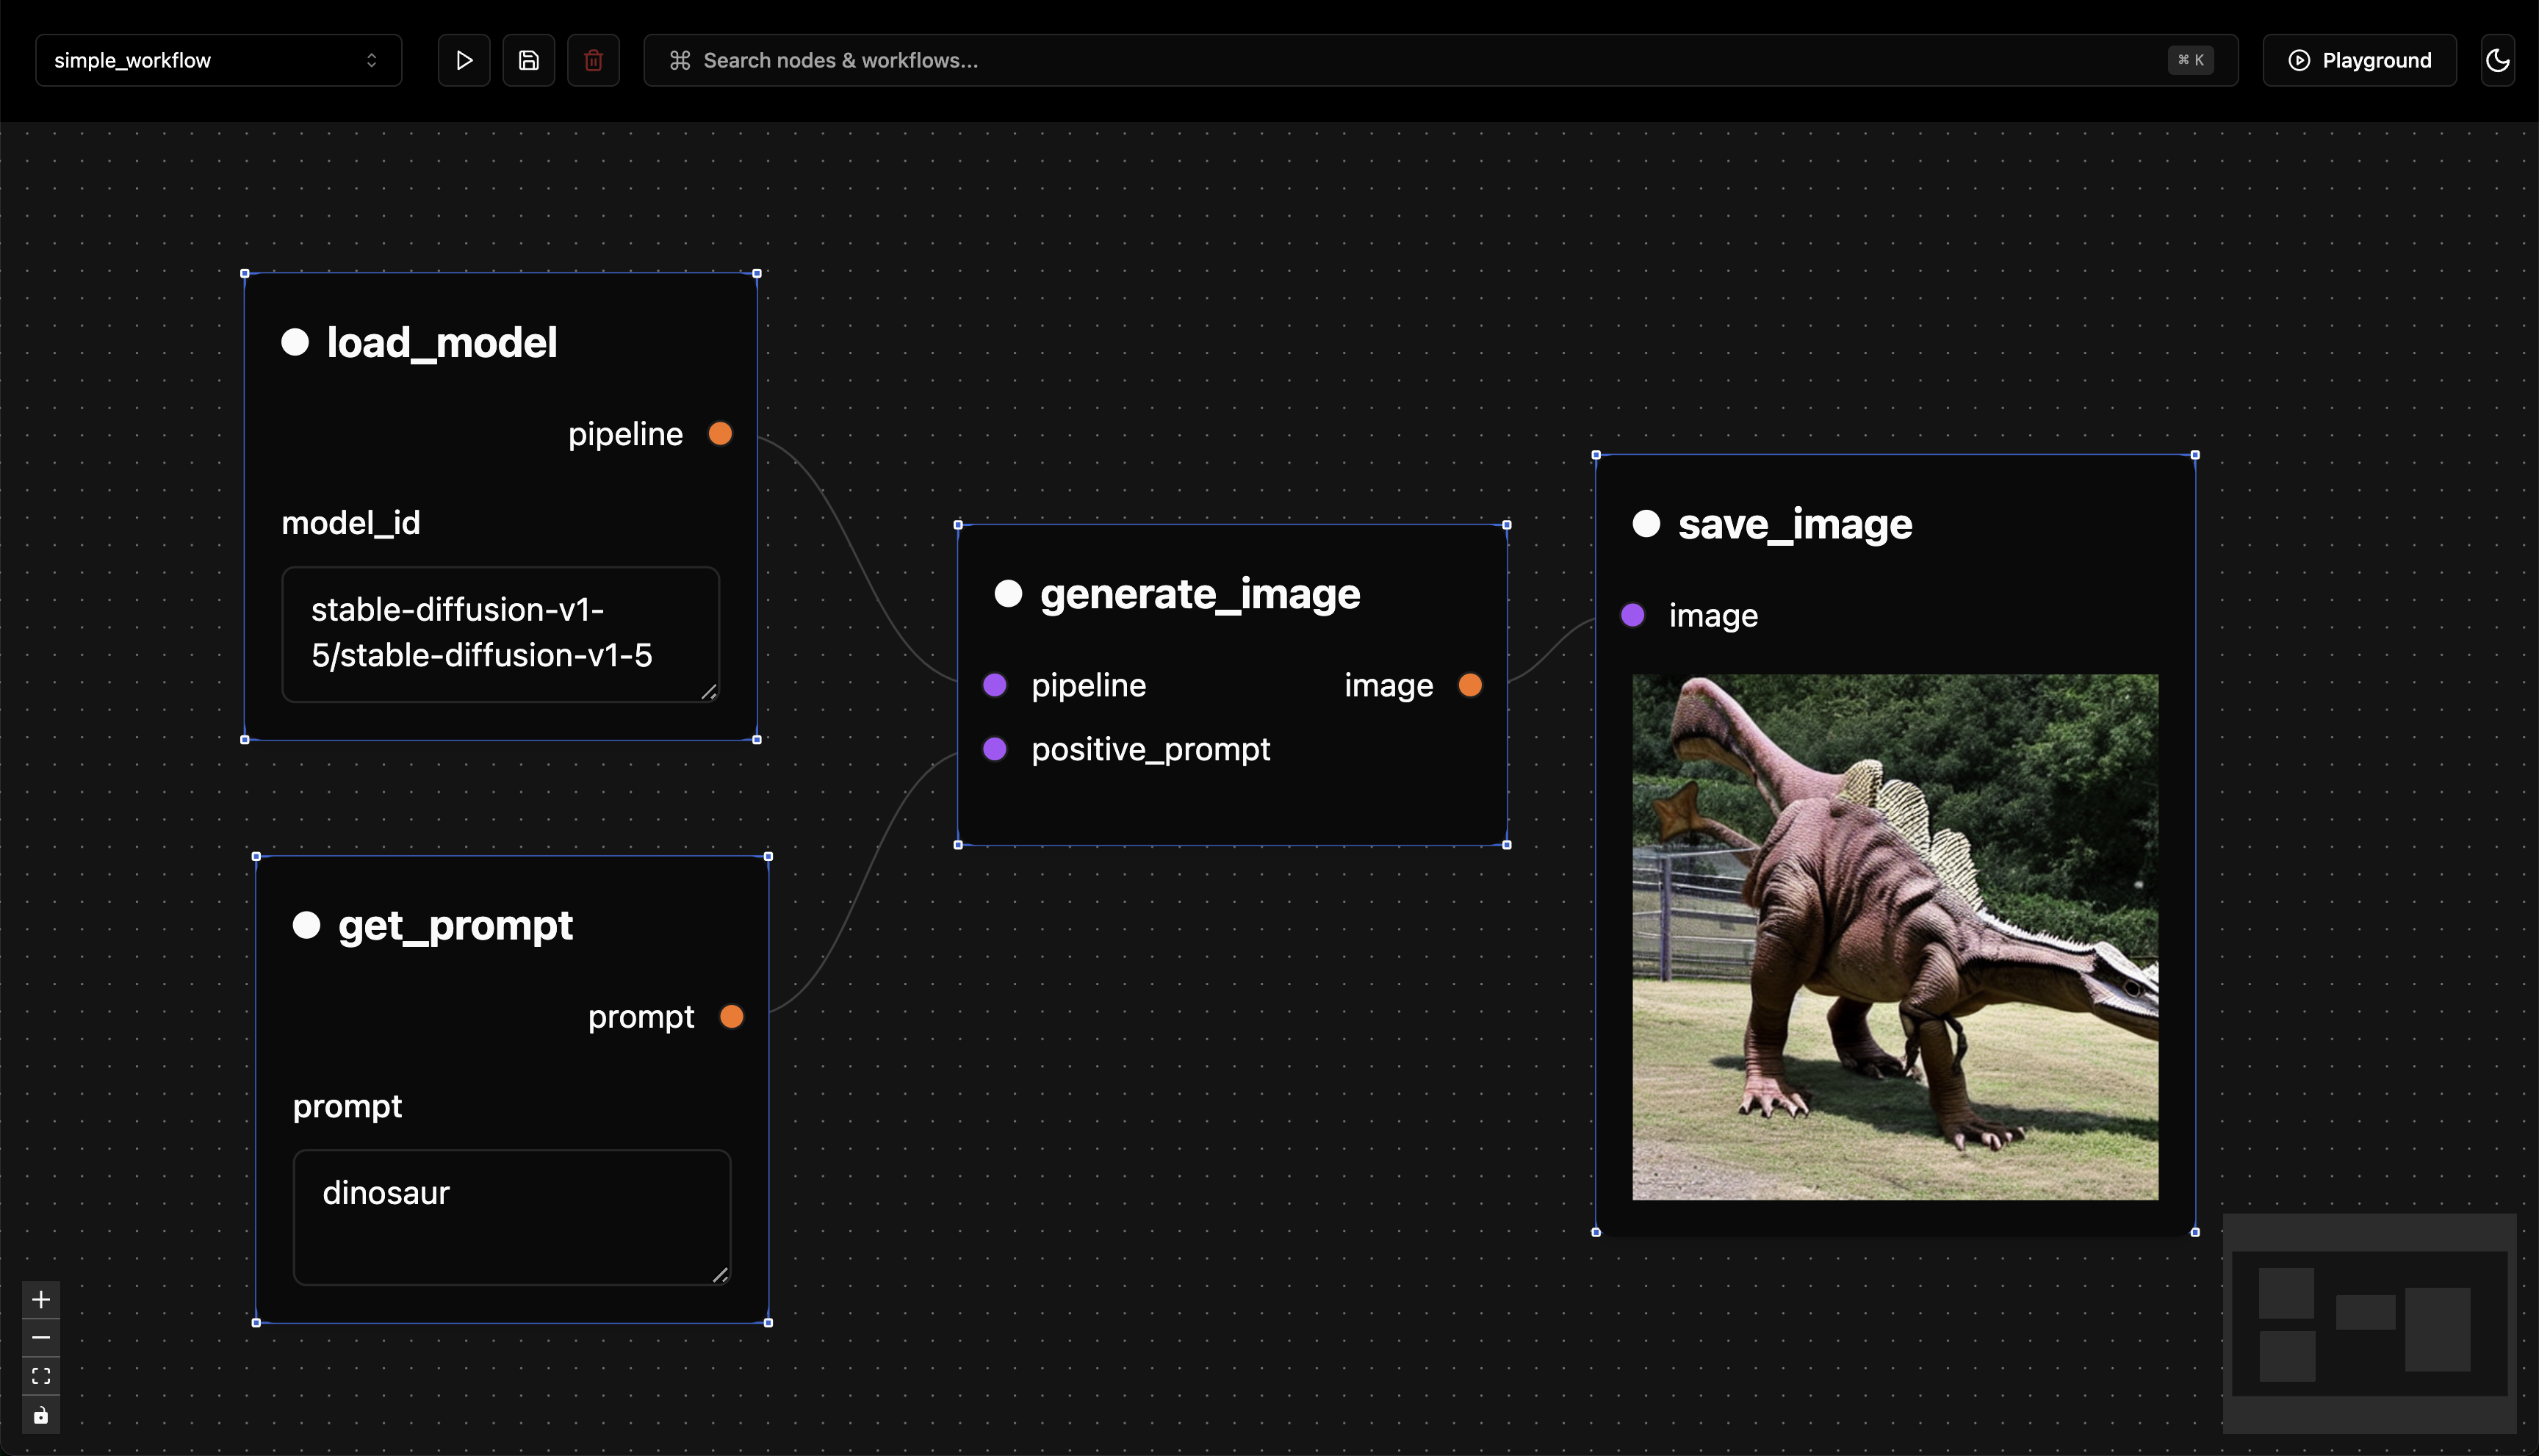
Here is a screenshot of an example workflow:
# Node Concepts
Source: https://docs.pipelineui.com/concepts/node
How nodes work in Pipeline‑UI
# Node Concepts
In Pipeline‑UI, a **node** is a Python function that represents a single processing step. Some key concepts include:
* **Decoration:** Add the `@node()` decorator to your function.
* **Inputs & Parameters:** Function arguments are split into node inputs (data from other nodes) and parameters (configuration values) based on their default value types.
* **Outputs:** The function’s return type, annotated with `NodeOutput` or a media output type (e.g., `ImageResponse`), designates what is passed on.
Nodes are automatically visualized in the UI where you can edit parameters, connect data, and run your pipelines interactively.
# Workflow Concepts
Source: https://docs.pipelineui.com/concepts/workflow
How workflows are designed and executed
# Workflow Concepts
A **workflow** in Pipeline‑UI is a set of interconnected nodes that define a complete process. Important aspects include:
* **Edge Connections:** Nodes are connected by input/output edges that define data flow.
* **Execution Order:** The core infers the execution order by analyzing the dependency graph.
* **Parameterization:** Workflows can accept parameters that feed into individual nodes.
* **Visualization:** Workflows are automatically rendered in the UI so you can see the overall flow.
Use the `@workflow()` decorator to convert your Python function into a visual workflow.
# How to Contribute
Source: https://docs.pipelineui.com/contributing/how-to-contribute
We welcome contributions to Pipeline‑UI! Whether you want to improve the documentation, add new nodes, or submit bug reports, here’s how you can help:
1. **Fork the Repository:** Create your own copy of the code.
2. **Create a Branch:** Work on your changes on a separate branch.
3. **Write Tests & Update Docs:** Make sure your changes are well tested and documented.
4. **Submit a Pull Request:** Open a pull request with a clear description of your changes.
Feel free to reach out on GitHub issues if you have any questions.
The justfile provides a list of commands to build the docs, run the tests, etc.
Run the following command to see the available commands in the pipeline-ui
```bash
just
```
# Differences with ComfyUI
Source: https://docs.pipelineui.com/get-started/difference-with-comfyui
Pipeline-UI is inspired by ComfyUI, an amazing project primarily designed for experimentation. While ComfyUI excels at experimentation, Pipeline-UI takes a different philosophical approach focused on production deployment. Key differences include:
* **Python-First Architecture:** Using Python decorators to define workflows and nodes, making it quick and intuitive to create new components entirely in Python
* **Direct Execution:** Since workflows are pure Python code, they're directly executable without additional interpretation layers
* **Flexible Deployment:** Workflows can be exposed via REST API endpoints or accessed through a playground GUI, making it simple to integrate into production systems
These differences provide a streamlined path from experimentation to production deployment, eliminating the complexity of translating experimental workflows into production-ready implementations.
Furtermore, Pipeline takes inspiration from a lot of projects to provide a better experience.
* Inspiration from [Replicate](https://replicate.com/)
* We want to offer a similar experience where you can run workflows in the cloud in 1 click with an extremly user friendly UI
* Inspiration from [Shadcn](https://ui.shadcn.com/)
* We want to offer a similar experience where you have full ownership of the code and can customize it as you want. You can even completly remove Pipeline-UI from your project and just run the code normally, no lock-in.
Focus on LLM enabled development
* Use cursor or windsurf to generate workflows code to enable for faster iteration and writing of workflows
# Introduction
Source: https://docs.pipelineui.com/get-started/introduction
What Is Pipeline UI?

Pipeline‑UI is a framework to create graphical machine learning pipelines using Python decorators. By simply annotating your Python functions with `@node` and `@workflow`, you instantly enable a visual interface to design, monitor, and run your ML workflows.
# Quickstart
Source: https://docs.pipelineui.com/get-started/quickstart
Get Pipeline‑UI up and running in minutes
## Step 1: Install
Create a virtual environment with uv or pip
You need to have uv installed on your system first, you can use this command to install it or go to uv install page for more information.
```bash
uv venv
```
```bash
python -m venv .venv
```
Activate the virtual environment
```bash
source .venv/bin/activate
```
```bash
.venv\Scripts\activate
```
Install Pipeline‑UI
```bash
uv pip install pipeline-ui
```
```bash
pip install pipeline-ui
```
## Step 2: Initialize Your Project
Run the initialization command which scaffolds a sample project:
```bash
pui init
```
## Step 3: Run the Server
Start the full‑stack server with:
```bash
pui start
```
Open your browser and navigate to [http://localhost:8114](http://localhost:8114) and explore the interactive UI.
## Step 4: Modify and Experiment
* Use the `@node` and `@workflow` decorators with your Python functions (see [Create a Custom Node](../how-to-guides/create-your-own-node.mdx) for details).
* Update your workflow, add new nodes and test them in the node based interface in the UI.
# Create a Custom Node
Source: https://docs.pipelineui.com/how-to-guides/create-your-own-node
Learn how to create a custom node in Pipeline‑UI
# How to Create a Custom Node
To expose any function as a node in Pipeline‑UI, simply add the `@node()` decorator. For example:
```python
from pipeline_ui import node, NodeInput, NodeOutput, TextParameter
from typing import Annotated
@node()
def add_numbers(
a: int = NodeInput(python_type=int, description="First number to add"),
b: int = NodeInput(python_type=int, description="Second number to add")
) -> Annotated[int, NodeOutput(name="sum", description="Sum of two numbers")]:
return a + b
```
### Steps for Creating Your Own Node
1. **Define the Function:** Write a Python function with the appropriate inputs.
2. **Decorate with @node():** Add the decorator.
3. **Annotate the Return Type:** Use `Annotated[, NodeOutput(...)]` to declare output properties.
4. **Customize Inputs:** Use `NodeInput` for required data and parameter classes (such as `TextParameter`, `NumberParameter`) for configuration defaults.
5. **Test in the UI:** Run the project; your node should appear as a draggable block in the editor.
For more advanced examples, check out our sample workflows in the [examples folder](https://github.com/specialbottle/pipeline-ui/tree/main/core/examples).
{/* Input Vs Parameters */}
{/* Add section that is a glossary and defines those terms and list all the different type that exist */}
# Create a Custom Workflow
Source: https://docs.pipelineui.com/how-to-guides/create-your-own-workflow
Learn how to create a custom workflow in Pipeline‑UI
A workflow ties multiple nodes together. To create a workflow, decorate a function with `@workflow()`. This function defines the data flow between your nodes.
## Example
```python
from typing import Annotated
from pipeline_ui import node, workflow, TextParameter, NodePosition, ImageOutput, ImageInput
from pipeline_ui.modules.node._response.response_media_schema import ImageResponse
@node()
def get_prompt(
prompt: str = TextParameter(default="A beautiful image", description="Image prompt")
) -> Annotated[str, NodeOutput(name="prompt", description="Encoded prompt")]:
return prompt
@node()
def generate_image(
prompt: str = NodeInput(python_type=str, description="The encoded prompt")
) -> Annotated["Image", ImageOutput(name="image", description="Generated image")]:
# Imagine your image generation code here
from PIL import Image
return Image.new("RGB", (256, 256), (255, 255, 255))
@workflow(positions=[
NodePosition(x=-100, y=-200, node="get_prompt"),
NodePosition(x=150, y=-200, node="generate_image")
])
def simple_workflow(
prompt: str = TextParameter(default="A beautiful image", description="Image prompt")
) -> Annotated["Image", ImageResponse(name="image", description="Final output", render=True)]:
encoded = get_prompt(prompt)
image = generate_image(encoded)
return image
```
### Tips
* Use the `positions` parameter in the workflow decorator to specify node locations on the canvas.
* Ensure that every node used in your workflow is connected (all input and output pins must be linked).
### Finding more examples
You can find more examples in the [examples](https://github.com/specialbottle/pipeline-ui/tree/main/core/examples) folder. Each file is a self-contained workflow that you can run.
# How to Serve a Workflow
Source: https://docs.pipelineui.com/how-to-guides/how-to-serve-a-workflow
# Serving a Workflow
Once your nodes and workflows are defined, you can serve them using the built‑in FastAPI server.
## Steps
1. **Define Your Workflow**\
Use the `@workflow()` decorator to create your workflow.
2. **Start the Server**\
Use the CLI command:
```bash
pui start
```
This launches the FastAPI server and the React UI.
3. **Access APIs and UI**
* REST endpoints (e.g. `/api/workflows`) let you run workflows.
* The web‑UI at [http://localhost:8114](http://localhost:8114) provides an interactive interface.
4. **Stream Execution Status**\
The backend streams workflow progress via Server‑Sent Events at `/api/workflows/sse/events`.
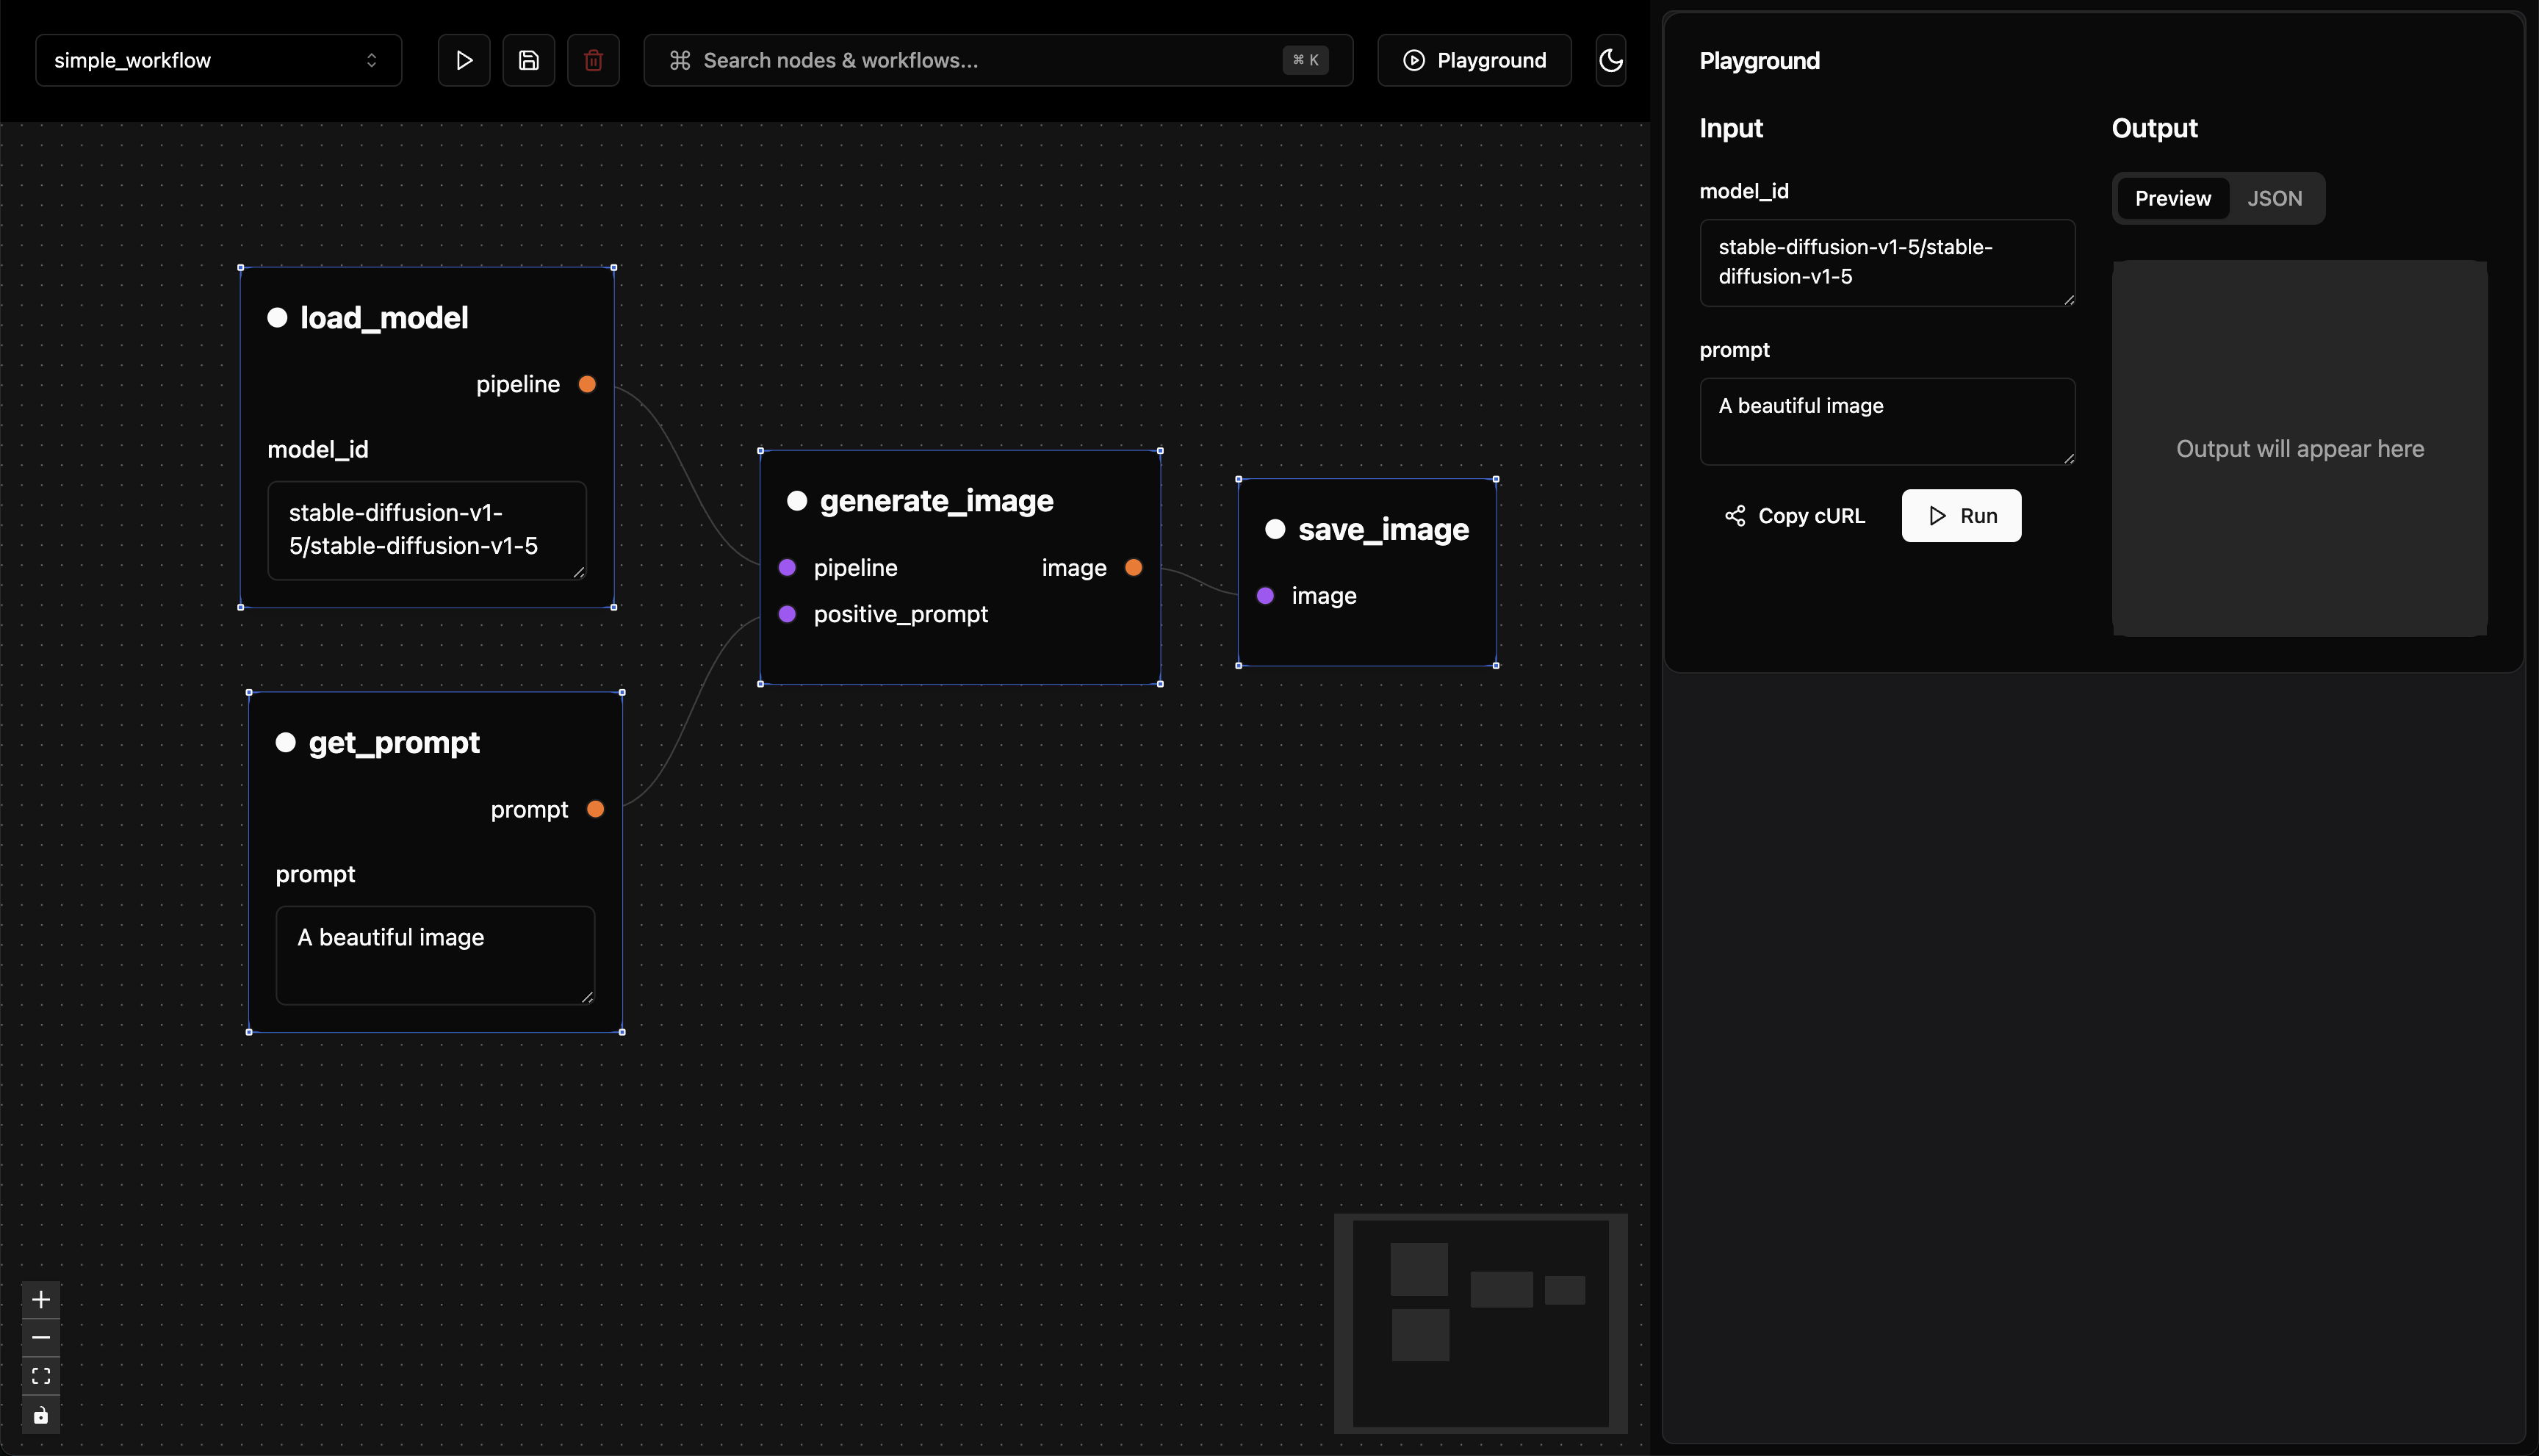
Using the playground UI, you can run your workflow by clicking the "Run" button.
Or you can copy the curl command and run it from the terminal.
```bash
curl -N -X POST \
'http://localhost:8114/api/workflows/run/simple_workflow' \
-H 'accept: application/json' \
-H 'Content-Type: application/json' \
-d '{
"input": {
"model_id": "stable-diffusion-v1-5/stable-diffusion-v1-5",
"prompt": "A beautiful image"
}
}'
```
This outputs the following:
You can also run the workflow using the REST API directly.
```json
{
"name": "simple_workflow",
"status": "completed",
"func_type": "workflow",
"duration": "36.70s",
"artifact_id": "1d76ee91-dda0-428a-8386-e3755d3fcca8",
"artifact_url": "localhost:8114/api/workflows/artifacts/1d76ee91-dda0-428a-8386-e3755d3fcca8"
}
```
As pipeline-ui is still in early development, the response format for the REST API is subject to change. In the future we want to align to replicate.com format as much as possible.
{/* TODO find the extact time it takes to expires
The `artifact_url` is a temporary URL that expires after a few minutes.
*/}
## Performance
What is really cool is that the API does not introduce any additional latency to the workflow!
Indeed, it is the same as running only your python code but exposed with a nice fastapi endpoint.
We do have some additional latency when we send the requests to the UI, but this is completly optional. Do not visit the UI webpage and then zero extra work is done to display the UI.
Btw, this took us a while to figure out. 😅
# How to Start a Pipeline‑UI Project
Source: https://docs.pipelineui.com/how-to-guides/how-to-start-a-pipeline-ui-project
This assumes you have already installed Pipeline‑UI. If not, see the [quickstart guide](../get-started/quickstart.mdx).
Follow these steps to create a new Pipeline‑UI project from scratch:
1. **Initialize the Project**
Use our CLI command to generate the project structure:
```bash
pui init
```
This will create folders for workflows, nodes, and an optional pack.
2. **Develop and Test**
Edit your node and workflow files. Run the project locally:
```bash
pui start
```
The server will hot-reload as you make changes to the code
The UI will be available at [http://localhost:8114](http://localhost:8114)

# How to Use the CLI
Source: https://docs.pipelineui.com/how-to-guides/how-to-use-cli
The CLI lets you initialize projects, run pipeline-ui
## Common Commands
* **Login**
```bash
pui login
```
* **Initialize Project**
```bash
pui init
```
* **Start Pipeline-UI (Folder Mode)**
```bash
pui start
```
optional arguments:
* path/to/your/project use . by default
this starts both the python backend and the react frontend
* **Start Pipeline-UI (File Mode)**
```bash
pui start-file path/to/your/script.py
```
For further details run:
```bash
pui --help
```
# How to Use the Web UI
Source: https://docs.pipelineui.com/how-to-guides/how-to-use-web-ui
The Pipeline‑UI web interface is designed for visual workflow configuration and monitoring.
## Accessing the UI
Once the server is running (by using `pui start`), open your browser to [http://localhost:8114](http://localhost:8114).
## Key Features
* **Node Canvas:** Drag and drop nodes to create your workflow.
* **Inspector Panels:** Click on a node to view and modify its parameters.
* **Playground:** Execute workflows and view real‑time results.
* **CLI Integration:** Use the UI to trigger CLI commands and view logs.
Explore the interactive documentation within the UI for more details.
* show image of the function the search
* the running part
* show gif of the workflow running or me clicking on stuff
[https://screen.studio/download](https://screen.studio/download) (request education discount)
# How to use Pipeline-UI with an AI IDE like Cursor
Source: https://docs.pipelineui.com/how-to-guides/integration-with-ai-ide
This page is about how to use Pipeline-UI with an AI IDE like Cursor.
## How to use Pipeline‑UI Documentation with LLMs
This documentation is following the [/llms.txt](https://llmstxt.org/) file format proposed by Jeremy Howard.
Therefore, you can access the full documentation in a markdown friendly format by clicking on the following link:
* [https://docs.pipelineui.com/llms.txt](https://docs.pipelineui.com/llms.txt) (short version gives the structure of the documentation)
* [https://docs.pipelineui.com//llms-full.txt](https://docs.pipelineui.com//llms-full.txt) (full text of the documentation)
This can then be used by LLM to get context about the Pipeline-UI library.
### Cursor
**Option 1:**
* Do `@Add` in cursor chat or composer panel and enter one of the two links above to give cursor access to the Pipeline-UI documentation.
**Option 2:**
* Do `@docs` in cursor chat or composer panel and enter one of the two links above to give cursor access to the Pipeline-UI documentation.
### Windsurf
I, unfortunately, do not use Windsurf yet. So feel free to open a PR to add how to use Pipeline-UI with Windsurf.
{/* # MCP server */}
{/* # Todo */}
# CLI Reference
Source: https://docs.pipelineui.com/references/cli
# CLI Reference
Pipeline‑UI comes with a command‑line interface (CLI) which enables you to:
* **Login:** Use the `pui login` command to authenticate with your access token.
* **Initialize a Project:** Use `pui init` to scaffold a new project.
* **Start the Server:** Use either `pui start` (for folders) or `pui start-file` (for single files) to run the pipeline-ui application with hot reloading.
For more details on each command run:
```bash
pui --help
```
# Glossary
Source: https://docs.pipelineui.com/references/glossary
A glossary of terms used in Pipeline‑UI
# Glossary
**Node:**\
A discrete function (decorated with `@node`) that represents a single step in your ML pipeline. Nodes have inputs, outputs, and parameters
**Workflow:**\
A collection of nodes connected by edges (decorated with `@workflow`) that define the flow of data and execution order
# Node Reference
Source: https://docs.pipelineui.com/references/node
# Node Reference
Nodes are at the heart of Pipeline‑UI. Each node is a Python function decorated with `@node()` that may declare:
* **Inputs:** Using decorators such as `NodeInput` or more specialized versions (e.g., `ImageInput`).
* **Outputs:** Returned values are annotated with `NodeOutput` (or a media–specific output type).
* **Parameters:** Use built‑in parameter classes (e.g. `NumberParameter`, `TextParameter`) to configure default values and validations.
Nodes are automatically transformed by the core into visual blocks in the UI. For details on creating custom nodes, see [How to Create a Custom Node](../how-to-guides/create-your-own-node.mdx).
TODO: The list of all the different type of Input node and parameter
# Workflow Reference
Source: https://docs.pipelineui.com/references/workflow
Workflows collect multiple nodes and define the order of execution. When you decorate a function with `@workflow()`, it:
* Accepts input parameters (which can be used to override node defaults).
* Establishes connections (edges) between nodes.
* Is displayed graphically in the UI as a complete pipeline.
The core automatically generates the necessary code from your workflow schema. See [How to Create a Custom Workflow](../how-to-guides/create-your-own-workflow.mdx) for step‑by‑step instructions.
* talk about edges and position
* talk about codegen, what type of code is allowed in the workflow (it parses edges)
(idea add a linter for worklows)